1. Setting up the “IP” mode
Press yellow button then zero button to go to menu as shown Picture a01 and a02
a01 >a02
2. Press F1 to go to main menu configuration as Picture a03.
a03
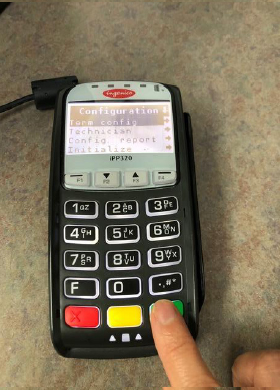
3. Press ok (green button) to go to Main Menu configuration as picture a04
a04
4. Press ok (green button) to go to as Configuration Term config as picture a05
a05
5. Press F2 to go to Term Config Communication as picture a06
a06
6. Press ok (green button) to go to Communication IP as picture a07
a07
7. Press ok (green button) to go to IP configuration as picture a08
a08
8. Press ok (green button) to continue as picture 9
a09
9. Press F1 button to select “No” as picture a10, IP Address is shown as 192.168.1.118 as picture a11
a010 a11
10. Press ok (green button) to select “Yes” as picture a12, Subnet mask IP address is shown as 255.255.255.0 as picture a13
a12 a13
11. Press ok (green button) to select “Yes” shown as picture a14
a14
12. Press ok (green button) to select “Yes” shown as picture a15
a15
13. Press ok (green button) to select “Yes” shown as picture a16
a16
14. The machine is in process.
A. Configuration of the "IP" communication between POS and pinpad follow the instruction below
1. Press yellow button then zero button to go to menu as shown Picture b01 and b02
b01
2. Press F1 to go to main menu configuration as Picture b02.
b02
2. Press F1 to go to main menu configuration as Picture b03.
b03
3. Press ok (green button) to go to Main Menu configuration as picture b04
b04
4. Press ok (green button) to go to Configuration Term config as picture b05
vb05
5. Press F2 twice to go to Term Config Pos comm as picture b06
b06
6. Press ok (green button) as picture07 to go to Pos Comm Configuration as picture b08
b07 b08
7. Press ok (green button) to go to configuration IP as picture b09
b09
8. Press ok (green button) to go to IP actived as picture b010 or Un instant SVP Please wait as picture b011
b10 b11
9. The machine is in process.
B. Registration of POS with payment terminal (static IP mode only)
1. Press yellow button then zero button to go to menu as shown Picture c01 and c02
c01 c02
2. Press F1 to go to main menu configuration as Picture c03
c03
3. Press ok (green button) to go to Main Menu configuration as picture c04
c04
4. Press ok (green button) to go to Configuration Term config as picture c05
c05
5. Press F2 two times to go to Term Config Pos comm as picture c06
c06
6. Press ok (green button) as picture c07 to go to Pos Comm as picture c08
c07 c08
7. Press F2 to select Registration as picture c09
c09
8. Press ok (green button) as Picture c10
c10
9. While Picture c10a shown on the RangerPOS, select REGISTER button.
c10a
10. Wait for the Registration till shown as picture c11
c11
11. Press ok (green button) as Picture c12 to complete the registration process.

 >a02
>a02


 vb05
vb05